More about forecasting in cienciadedatos.net
- ARIMA and SARIMAX models with python
- Time series forecasting with machine learning
- Forecasting time series with gradient boosting: XGBoost, LightGBM and CatBoost
- Forecasting time series with XGBoost
- Global Forecasting Models: Multi-series forecasting
- Global Forecasting Models: Comparative Analysis of Single and Multi-Series Forecasting Modeling
- Probabilistic forecasting
- Forecasting with deep learning
- Forecasting energy demand with machine learning
- Forecasting web traffic with machine learning
- Intermittent demand forecasting
- Modelling time series trend with tree-based models
- Bitcoin price prediction with Python
- Stacking ensemble of machine learning models to improve forecasting
- Interpretable forecasting models
- Mitigating the Impact of Covid on forecasting Models
- Forecasting time series with missing values

Introduction
Energy demand forecasting plays a critical role in effectively managing and planning resources for power generation, distribution, and utilization. Predicting energy demand is a complex task influenced by factors such as weather patterns, economic conditions, and societal behavior. This document will examine the creation of forecasting models utilizing machine learning to predict energy demand.
Time series and forecasting
A time series is a sequence of chronologically ordered data at equal or unequal intervals. The forecasting process consists of predicting the future value of a time series, either by modelling the series solely on the basis of its past behavior (autoregressive) or by using other external variables.
When working with time series, it is rarely necessary to predict only the next element in the series ($t_{+1}$). Instead, the most common goal is to forecast a whole future interval (($t_{+1}$), ..., ($t_{+n}$)) or a far future time ($t_{+n}$). Several strategies can be used to generate this type of forecast, skforecast has implemented the following for univariate time series forecasting:
- Recursive multi-step forecasting: since the value $t_{n-1}$ is needed to predict $t_{n}$, and $t_{n-1}$ is unknown, a recursive process is applied in which, each new prediction, is based on the previous one. This process is known as recursive forecasting or recursive multi-step forecasting and can be easily generated with the
ForecasterRecursiveclass.

- Direct multi-step forecasting: this method consists of training a different model for each step of the forecast horizon. For example, to predict the next 5 values of a time series, 5 different models are trained, one for each step. As a result, the predictions are independent of each other. This entire process is automated in the
ForecasterDirectclass.

- Forecasting multi-output: Some machine learning models, such as long short-term memory (LSTM) neural networks, can predict multiple values of a sequence simultaneously (one-shot). This strategy implemented in the
ForecasterRnnclass.
✏️ Note
Two other great examples of how to use gradient boosting for time series forecasting are:
Libraries
The libraries used in this document are:
# Data manipulation
# ==============================================================================
import numpy as np
import pandas as pd
from astral.sun import sun
from astral import LocationInfo
from skforecast.datasets import fetch_dataset
from feature_engine.datetime import DatetimeFeatures
from feature_engine.creation import CyclicalFeatures
from feature_engine.timeseries.forecasting import WindowFeatures
# Plots
# ==============================================================================
import matplotlib.pyplot as plt
from statsmodels.graphics.tsaplots import plot_acf, plot_pacf
from skforecast.plot import plot_residuals
import plotly.graph_objects as go
import plotly.io as pio
import plotly.offline as poff
pio.templates.default = "seaborn"
poff.init_notebook_mode(connected=True)
plt.style.use('seaborn-v0_8-darkgrid')
plt.rcParams.update({'font.size': 8})
# Modelling and Forecasting
# ==============================================================================
import skforecast
import lightgbm
import sklearn
from lightgbm import LGBMRegressor
from sklearn.preprocessing import PolynomialFeatures
from sklearn.feature_selection import RFECV
from skforecast.recursive import ForecasterEquivalentDate, ForecasterRecursive
from skforecast.direct import ForecasterDirect
from skforecast.model_selection import TimeSeriesFold, bayesian_search_forecaster, backtesting_forecaster
from skforecast.feature_selection import select_features
from skforecast.preprocessing import RollingFeatures
from skforecast.plot import calculate_lag_autocorrelation, plot_residuals
from skforecast.metrics import calculate_coverage
import shap
# Warnings configuration
# ==============================================================================
import warnings
warnings.filterwarnings('once')
color = '\033[1m\033[38;5;208m'
print(f"{color}Version skforecast: {skforecast.__version__}")
print(f"{color}Version scikit-learn: {sklearn.__version__}")
print(f"{color}Version lightgbm: {lightgbm.__version__}")
print(f"{color}Version pandas: {pd.__version__}")
print(f"{color}Version numpy: {np.__version__}")
Version skforecast: 0.22.0 Version scikit-learn: 1.7.2 Version lightgbm: 4.6.0 Version pandas: 2.3.3 Version numpy: 2.1.3
Data
A time series of electricity demand (MW) is available for the state of Victoria (Australia) from 2011-12-31 to 2014-12-31 is available. The data used in this document has been obtained from the R tsibbledata package. The dataset contains 5 columns and 52,608 complete records. The information in each column is:
- Time: date and time of the record.
- Date: date of the record.
- Demand: electricity demand (MW).
- Temperature: temperature in Melbourne, the capital of Victoria.
- Holiday: indicates if the day is a public holiday.
# Data download
# ==============================================================================
data = fetch_dataset(name='vic_electricity', raw=True)
data.info()
╭──────────────────────────── vic_electricity ─────────────────────────────╮ │ Description: │ │ Half-hourly electricity demand for Victoria, Australia │ │ │ │ Source: │ │ O'Hara-Wild M, Hyndman R, Wang E, Godahewa R (2022).tsibbledata: Diverse │ │ Datasets for 'tsibble'. https://tsibbledata.tidyverts.org/, │ │ https://github.com/tidyverts/tsibbledata/. │ │ https://tsibbledata.tidyverts.org/reference/vic_elec.html │ │ │ │ URL: │ │ https://raw.githubusercontent.com/skforecast/skforecast- │ │ datasets/main/data/vic_electricity.csv │ │ │ │ Shape: 52608 rows x 5 columns │ ╰──────────────────────────────────────────────────────────────────────────╯
<class 'pandas.core.frame.DataFrame'> RangeIndex: 52608 entries, 0 to 52607 Data columns (total 5 columns): # Column Non-Null Count Dtype --- ------ -------------- ----- 0 Time 52608 non-null object 1 Demand 52608 non-null float64 2 Temperature 52608 non-null float64 3 Date 52608 non-null object 4 Holiday 52608 non-null bool dtypes: bool(1), float64(2), object(2) memory usage: 1.7+ MB
The Time column is stored as a string. To convert it to datetime, the function pd.to_datetime() is used. Once in datetime format, and to make use of pandas functionalities, it is set as an index. Since the data was recorded every 30 minutes, the frequency '30min' is also specified.
# Data preparation
# ==============================================================================
data = data.copy()
data['Time'] = pd.to_datetime(data['Time'], format='%Y-%m-%dT%H:%M:%SZ')
data = data.set_index('Time')
data = data.asfreq('30min')
data = data.sort_index()
data.head(2)
| Demand | Temperature | Date | Holiday | |
|---|---|---|---|---|
| Time | ||||
| 2011-12-31 13:00:00 | 4382.825174 | 21.40 | 2012-01-01 | True |
| 2011-12-31 13:30:00 | 4263.365526 | 21.05 | 2012-01-01 | True |
One of the first analyses to be carried out when working with time series is to check that the series is complete, that is, that there are no missing values.
# Verify that a temporary index is complete
# ==============================================================================
start_date = data.index.min()
end_date = data.index.max()
complete_date_range = pd.date_range(start=start_date, end=end_date, freq=data.index.freq)
is_index_complete = (data.index == complete_date_range).all()
print(f"Index complete: {is_index_complete}")
print(f"Number of rows with missing values: {data.isnull().any(axis=1).mean()}")
Index complete: True Number of rows with missing values: 0.0
# Fill gaps in a temporary index
# ==============================================================================
# data.asfreq(freq='30min', fill_value=np.nan)
Although the data is at 30 minute intervals, the aim is to create a model capable of predicting hourly electricity demand, so the data needs to be aggregated. This type of transformation can be done very easily by combining the Pandas DatetimeIndex index and its resample() method.
It is very important to use the closed='left' and label='right' arguments correctly to avoid introducing future information into the training, leakage). Suppose that values are available for 10:10, 10:30, 10:45, 11:00, 11:12, and 11:30. To obtain the hourly average, the value assigned to 11:00 must be calculated using the values for 10:10, 10:30, and 10:45; and the value assigned to 12:00 must be calculated using the value for 11:00, 11:12 and 11:30.
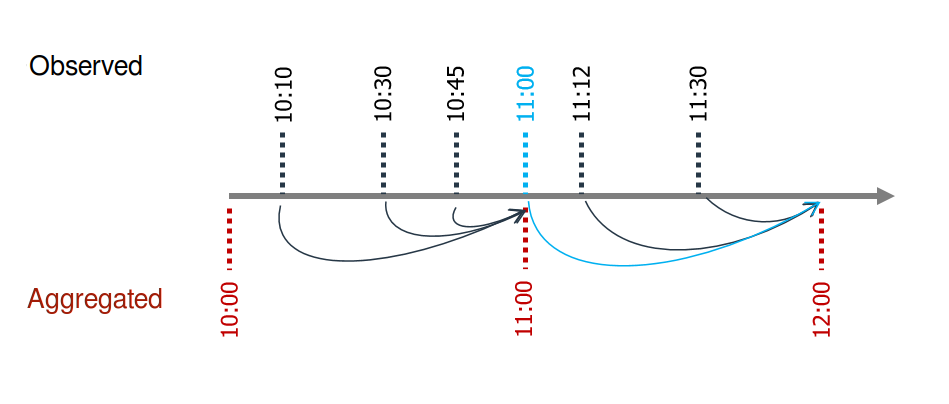
The 11:00 average does not include the 11:00 point value because in reality the value is not available at that exact time.
# Aggregating in 1H intervals
# ==============================================================================
# The Date column is eliminated so that it does not generate an error when aggregating.
data = data.drop(columns="Date")
data = (
data
.resample(rule="h", closed="left", label="right")
.agg({
"Demand": "mean",
"Temperature": "mean",
"Holiday": "mean",
})
)
data
| Demand | Temperature | Holiday | |
|---|---|---|---|
| Time | |||
| 2011-12-31 14:00:00 | 4323.095350 | 21.225 | 1.0 |
| 2011-12-31 15:00:00 | 3963.264688 | 20.625 | 1.0 |
| 2011-12-31 16:00:00 | 3950.913495 | 20.325 | 1.0 |
| 2011-12-31 17:00:00 | 3627.860675 | 19.850 | 1.0 |
| 2011-12-31 18:00:00 | 3396.251676 | 19.025 | 1.0 |
| ... | ... | ... | ... |
| 2014-12-31 09:00:00 | 4069.625550 | 21.600 | 0.0 |
| 2014-12-31 10:00:00 | 3909.230704 | 20.300 | 0.0 |
| 2014-12-31 11:00:00 | 3900.600901 | 19.650 | 0.0 |
| 2014-12-31 12:00:00 | 3758.236494 | 18.100 | 0.0 |
| 2014-12-31 13:00:00 | 3785.650720 | 17.200 | 0.0 |
26304 rows × 3 columns
The dataset starts on 2011-12-31 14:00:00 and ends on 2014-12-31 13:00:00. The first 10 and the last 13 records are discarded so that it starts on 2012-01-01 00:00:00 and ends on 2014-12-30 23:00:00. In addition, in order to optimize the hyperparameters of the model and evaluate its predictive ability, the data is divided into 3 sets: training, validation and test.
# Split data into train-val-test
# ==============================================================================
data = data.loc['2012-01-01 00:00:00':'2014-12-30 23:00:00', :].copy()
end_train = '2013-12-31 23:59:00'
end_validation = '2014-11-30 23:59:00'
data_train = data.loc[: end_train, :].copy()
data_val = data.loc[end_train:end_validation, :].copy()
data_test = data.loc[end_validation:, :].copy()
print(f"Train dates : {data_train.index.min()} --- {data_train.index.max()} (n={len(data_train)})")
print(f"Validation dates : {data_val.index.min()} --- {data_val.index.max()} (n={len(data_val)})")
print(f"Test dates : {data_test.index.min()} --- {data_test.index.max()} (n={len(data_test)})")
Train dates : 2012-01-01 00:00:00 --- 2013-12-31 23:00:00 (n=17544) Validation dates : 2014-01-01 00:00:00 --- 2014-11-30 23:00:00 (n=8016) Test dates : 2014-12-01 00:00:00 --- 2014-12-30 23:00:00 (n=720)
Graphic exploration
Graphical exploration of time series can be an effective way of identifying trends, patterns, and seasonal variations. This, in turn, helps to guide the selection of the most appropriate forecasting model.
Plot time series
Full time series
# Interactive plot of time series
# ==============================================================================
fig = go.Figure()
fig.add_trace(go.Scatter(x=data_train.index, y=data_train['Demand'], mode='lines', name='Train'))
fig.add_trace(go.Scatter(x=data_val.index, y=data_val['Demand'], mode='lines', name='Validation'))
fig.add_trace(go.Scatter(x=data_test.index, y=data_test['Demand'], mode='lines', name='Test'))
fig.update_layout(
title='Hourly energy demand',
xaxis_title="Time",
yaxis_title="Demand",
legend_title="Partition:",
width=800,
height=400,
margin=dict(l=20, r=20, t=35, b=20),
legend=dict(orientation="h", yanchor="top", y=1, xanchor="left", x=0.001)
)
#fig.update_xaxes(rangeslider_visible=True)
fig.show()
The graph above shows that electricity demand has an annual seasonality. There is a peak in July and very pronounced peaks in demand between January and March.
Section of the time series
Due to the variance of the time series, it is not possible to see the possible intraday pattern from a single chart.
# Zooming time series chart
# ==============================================================================
zoom = ('2013-05-01 14:00:00','2013-06-01 14:00:00')
fig, axs = plt.subplots(2, 1, figsize=(8, 4), gridspec_kw={"height_ratios": [1, 2]})
data["Demand"].plot(ax=axs[0], color="black", alpha=0.5)
axs[0].axvspan(zoom[0], zoom[1], color="blue", alpha=0.7)
axs[0].set_title("Electricity demand")
axs[0].set_xlabel("")
data.loc[zoom[0] : zoom[1], "Demand"].plot(ax=axs[1], color="blue")
axs[1].set_title(f"Zoom: {zoom[0]} to {zoom[1]}", fontsize=10)
plt.tight_layout()
plt.show()

When the time series are zoomed in, a clear weekly seasonality can be seen, with higher consumption during the working week (Monday to Friday) and lower consumption at weekends. There is also a clear correlation between the consumption of one day and that of the previous day.
Seasonality plots
Seasonal plots are a useful tool for identifying seasonal patterns and trends in a time series. They are created by averaging the values of each season over time and then plotting them against time.
# Annual, weekly and daily seasonality
# ==============================================================================
fig, axs = plt.subplots(2, 2, figsize=(8, 5), sharex=False, sharey=True)
axs = axs.ravel()
# Demand distribution by month
data['month'] = data.index.month
data.boxplot(column='Demand', by='month', ax=axs[0], flierprops={'markersize': 3, 'alpha': 0.3})
data.groupby('month')['Demand'].median().plot(style='o-', linewidth=0.8, ax=axs[0])
axs[0].set_ylabel('Demand')
axs[0].set_title('Demand distribution by month', fontsize=9)
# Demand distribution by week day
data['week_day'] = data.index.day_of_week + 1
data.boxplot(column='Demand', by='week_day', ax=axs[1], flierprops={'markersize': 3, 'alpha': 0.3})
data.groupby('week_day')['Demand'].median().plot(style='o-', linewidth=0.8, ax=axs[1])
axs[1].set_ylabel('Demand')
axs[1].set_title('Demand distribution by week day', fontsize=9)
# Demand distribution by the hour of the day
data['hour_day'] = data.index.hour + 1
data.boxplot(column='Demand', by='hour_day', ax=axs[2], flierprops={'markersize': 3, 'alpha': 0.3})
data.groupby('hour_day')['Demand'].median().plot(style='o-', linewidth=0.8, ax=axs[2])
axs[2].set_ylabel('Demand')
axs[2].set_title('Demand distribution by the hour of the day', fontsize=9)
# Demand distribution by week day and hour of the day
mean_day_hour = data.groupby(["week_day", "hour_day"])["Demand"].mean()
mean_day_hour.plot(ax=axs[3])
axs[3].set(
title = "Mean Demand during week",
xticks = [i * 24 for i in range(7)],
xticklabels = ["Mon", "Tue", "Wed", "Thu", "Fri", "Sat", "Sun"],
xlabel = "Day and hour",
ylabel = "Number of Demand"
)
axs[3].title.set_size(10)
fig.suptitle("Seasonality plots", fontsize=12)
fig.tight_layout()

There is an annual seasonality, with higher (median) demand values in the months of June, July and August, and high peak demand values in the months of November, December, January, February and March. There is a weekly seasonality, with lower demand during the weekend. There is also a daily seasonality, with demand decreasing between 16:00 and 21:00.
Autocorrelation plots
Auto-correlation plots are a useful tool for identifying the order of an autoregressive model. The autocorrelation function (ACF) is a measure of the correlation between the time series and a lagged version of itself. The partial autocorrelation function (PACF) is a measure of the correlation between the time series and a lagged version of itself, controlling for the values of the time series at all shorter lags. These plots are useful for identifying the lags to be included in the autoregressive model.
# Autocorrelation plot
# ==============================================================================
fig, ax = plt.subplots(figsize=(5, 2))
plot_acf(data['Demand'], ax=ax, lags=60, fft=True)
plt.show()

# Partial autocorrelation plot
# ==============================================================================
fig, ax = plt.subplots(figsize=(5, 2))
plot_pacf(data['Demand'], ax=ax, lags=60, method='burg')
plt.show()

# Top 10 lags with the highest absolute partial autocorrelation
# ==============================================================================
calculate_lag_autocorrelation(
data = data['Demand'],
n_lags = 60,
sort_by = "partial_autocorrelation_abs",
acf_kwargs = {'fft': True},
pacf_kwargs = {'method': 'burg'}
).head(10)
| lag | partial_autocorrelation_abs | partial_autocorrelation | autocorrelation_abs | autocorrelation | |
|---|---|---|---|---|---|
| 0 | 1 | 0.949501 | 0.949501 | 0.949490 | 0.949490 |
| 1 | 25 | 0.760292 | -0.760292 | 0.731620 | 0.731620 |
| 2 | 2 | 0.657646 | -0.657646 | 0.836792 | 0.836792 |
| 3 | 26 | 0.629453 | 0.629453 | 0.622458 | 0.622458 |
| 4 | 24 | 0.307403 | -0.307403 | 0.785622 | 0.785622 |
| 5 | 19 | 0.290817 | 0.290817 | 0.302308 | 0.302308 |
| 6 | 27 | 0.274043 | -0.274043 | 0.488351 | 0.488351 |
| 7 | 21 | 0.268972 | 0.268972 | 0.537173 | 0.537173 |
| 8 | 20 | 0.201101 | 0.201101 | 0.414709 | 0.414709 |
| 9 | 9 | 0.184617 | 0.184617 | 0.037677 | 0.037677 |
The autocorrelation plot demonstrates a strong correlation between demand in one hour and prior hours, as well as between demand in one hour and the corresponding hour in preceding days. This observed correlation suggests that autoregressive models may be effective in this scenario.
Baseline
When faced with a forecasting problem, it is important to establish a baseline model. This is usually a very simple model that can be used as a reference to assess whether more complex models are worth implementing.
Skforecast allows you to easily create a baseline with its class ForecasterEquivalentDate. This model, also known as Seasonal Naive Forecasting, simply returns the value observed in the same period of the previous season (e.g., the same working day from the previous week, the same hour from the previous day, etc.).
Based on the exploratory analysis performed, the baseline model will be the one that predicts each hour using the value of the same hour on the previous day.
✏️ Note
In the following code cells, a baseline forecaster is trained and its predictive ability is evaluated using a backtesting process. If this concept is new to you, do not worry, it will be explained in detail throughout the document. For now, it is sufficient to know that the backtesting process consists of training the model with a certain amount of data and evaluating its predictive ability with the data that the model has not seen. The error metric will be used as a reference to evaluate the predictive ability of the more complex models that will be implemented later.
# Create baseline: value of the same hour of the previous day
# ==============================================================================
forecaster = ForecasterEquivalentDate(
offset = pd.DateOffset(days=1),
n_offsets = 1
)
# Train forecaster
# ==============================================================================
forecaster.fit(y=data.loc[:end_validation, 'Demand'])
forecaster
ForecasterEquivalentDate
General Information
- Estimator: NoneType
- Offset:
- Number of offsets: 1
- Aggregation function: mean
- Window size: 24
- Creation date: 2026-05-03 12:35:57
- Last fit date: 2026-05-03 12:35:57
- Skforecast version: 0.22.0
- Python version: 3.12.13
- Forecaster id: None
Training Information
- Training range: [Timestamp('2012-01-01 00:00:00'), Timestamp('2014-11-30 23:00:00')]
- Training index type: DatetimeIndex
- Training index frequency:
# Backtesting
# ==============================================================================
cv = TimeSeriesFold(
steps = 24,
initial_train_size = len(data.loc[:end_validation]),
refit = False
)
metric, predictions = backtesting_forecaster(
forecaster = forecaster,
y = data['Demand'],
cv = cv,
metric = 'mean_absolute_error'
)
metric
| mean_absolute_error | |
|---|---|
| 0 | 308.375272 |
The error of the baseline model is used as a reference to assess whether the more complex models are worth implementing.
Recursive multi-step forecasting
A recursive autoregressive model ForecasterRecursive is trained using a gradient boosting estimator LGBMRegressor, to predict energy demand for the next 24 hours.
The predictors used are the demand values from the past 24 hours (24 lags) as well as the moving average of the past 3 days. The estimator's hyperparameters are left at their default values.
# Create forecaster
# ==============================================================================
window_features = RollingFeatures(stats=["mean"], window_sizes=24 * 3)
forecaster = ForecasterRecursive(
estimator = LGBMRegressor(random_state=15926, verbose=-1),
lags = 24,
window_features = window_features
)
# Train forecaster
# ==============================================================================
forecaster.fit(y=data.loc[:end_validation, 'Demand'])
forecaster
ForecasterRecursive
General Information
- Estimator: LGBMRegressor
- Lags: [ 1 2 3 4 5 6 7 8 9 10 11 12 13 14 15 16 17 18 19 20 21 22 23 24]
- Window features: ['roll_mean_72']
- Window size: 72
- Series name: Demand
- Exogenous included: False
- Categorical features: auto
- Weight function included: False
- Differentiation order: None
- Drop NaN from series: False
- Creation date: 2026-05-03 12:35:58
- Last fit date: 2026-05-03 12:36:03
- Skforecast version: 0.22.0
- Python version: 3.12.13
- Forecaster id: None
Exogenous Variables
None
Data Transformations
- Transformer for y: None
- Transformer for exog: None
Training Information
- Training range: [Timestamp('2012-01-01 00:00:00'), Timestamp('2014-11-30 23:00:00')]
- Training index type: DatetimeIndex
- Training index frequency:
Estimator Parameters
-
{'boosting_type': 'gbdt', 'class_weight': None, 'colsample_bytree': 1.0, 'importance_type': 'split', 'learning_rate': 0.1, 'max_depth': -1, 'min_child_samples': 20, 'min_child_weight': 0.001, 'min_split_gain': 0.0, 'n_estimators': 100, 'n_jobs': None, 'num_leaves': 31, 'objective': None, 'random_state': 15926, 'reg_alpha': 0.0, 'reg_lambda': 0.0, 'subsample': 1.0, 'subsample_for_bin': 200000, 'subsample_freq': 0, 'verbose': -1}
Fit Kwargs
-
{}
Backtesting
To obtain a robust estimate of the model's predictive ability, a backtesting process is performed. The backtesting process consists of generating a forecast for each observation in the test set, following the same procedure as would be done in production, and then comparing the predicted value to the actual value.
The backtesting process is applied using the backtesting_forecaster() function. For this use case, the simulation is carried out as follows: the model is trained with data from 2012-01-01 00:00 to 2014-11-30 23:00, and then it predicts the next 24 hours every day at 23:59. The error metric used is the Mean Absolute Error (MAE).
It is highly recommended to review the documentation for the backtesting_forecaster() function to gain a better understanding of its capabilities. This will help to utilize its full potential to analyze the predictive ability of the model.
# Backtesting
# ==============================================================================
metric, predictions = backtesting_forecaster(
forecaster = forecaster,
y = data['Demand'],
cv = cv,
metric = 'mean_absolute_error',
verbose = True, # Set to False to avoid printing
)
Information of folds
--------------------
Number of observations used for initial training: 25560
Number of observations used for backtesting: 720
Number of folds: 30
Number skipped folds: 0
Number of steps per fold: 24
Number of steps to exclude between last observed data (last window) and predictions (gap): 0
Fold: 0
Training: 2012-01-01 00:00:00 -- 2014-11-30 23:00:00 (n=25560)
Validation: 2014-12-01 00:00:00 -- 2014-12-01 23:00:00 (n=24)
Fold: 1
Training: No training in this fold
Validation: 2014-12-02 00:00:00 -- 2014-12-02 23:00:00 (n=24)
Fold: 2
Training: No training in this fold
Validation: 2014-12-03 00:00:00 -- 2014-12-03 23:00:00 (n=24)
Fold: 3
Training: No training in this fold
Validation: 2014-12-04 00:00:00 -- 2014-12-04 23:00:00 (n=24)
Fold: 4
Training: No training in this fold
Validation: 2014-12-05 00:00:00 -- 2014-12-05 23:00:00 (n=24)
Fold: 5
Training: No training in this fold
Validation: 2014-12-06 00:00:00 -- 2014-12-06 23:00:00 (n=24)
Fold: 6
Training: No training in this fold
Validation: 2014-12-07 00:00:00 -- 2014-12-07 23:00:00 (n=24)
Fold: 7
Training: No training in this fold
Validation: 2014-12-08 00:00:00 -- 2014-12-08 23:00:00 (n=24)
Fold: 8
Training: No training in this fold
Validation: 2014-12-09 00:00:00 -- 2014-12-09 23:00:00 (n=24)
Fold: 9
Training: No training in this fold
Validation: 2014-12-10 00:00:00 -- 2014-12-10 23:00:00 (n=24)
Fold: 10
Training: No training in this fold
Validation: 2014-12-11 00:00:00 -- 2014-12-11 23:00:00 (n=24)
Fold: 11
Training: No training in this fold
Validation: 2014-12-12 00:00:00 -- 2014-12-12 23:00:00 (n=24)
Fold: 12
Training: No training in this fold
Validation: 2014-12-13 00:00:00 -- 2014-12-13 23:00:00 (n=24)
Fold: 13
Training: No training in this fold
Validation: 2014-12-14 00:00:00 -- 2014-12-14 23:00:00 (n=24)
Fold: 14
Training: No training in this fold
Validation: 2014-12-15 00:00:00 -- 2014-12-15 23:00:00 (n=24)
Fold: 15
Training: No training in this fold
Validation: 2014-12-16 00:00:00 -- 2014-12-16 23:00:00 (n=24)
Fold: 16
Training: No training in this fold
Validation: 2014-12-17 00:00:00 -- 2014-12-17 23:00:00 (n=24)
Fold: 17
Training: No training in this fold
Validation: 2014-12-18 00:00:00 -- 2014-12-18 23:00:00 (n=24)
Fold: 18
Training: No training in this fold
Validation: 2014-12-19 00:00:00 -- 2014-12-19 23:00:00 (n=24)
Fold: 19
Training: No training in this fold
Validation: 2014-12-20 00:00:00 -- 2014-12-20 23:00:00 (n=24)
Fold: 20
Training: No training in this fold
Validation: 2014-12-21 00:00:00 -- 2014-12-21 23:00:00 (n=24)
Fold: 21
Training: No training in this fold
Validation: 2014-12-22 00:00:00 -- 2014-12-22 23:00:00 (n=24)
Fold: 22
Training: No training in this fold
Validation: 2014-12-23 00:00:00 -- 2014-12-23 23:00:00 (n=24)
Fold: 23
Training: No training in this fold
Validation: 2014-12-24 00:00:00 -- 2014-12-24 23:00:00 (n=24)
Fold: 24
Training: No training in this fold
Validation: 2014-12-25 00:00:00 -- 2014-12-25 23:00:00 (n=24)
Fold: 25
Training: No training in this fold
Validation: 2014-12-26 00:00:00 -- 2014-12-26 23:00:00 (n=24)
Fold: 26
Training: No training in this fold
Validation: 2014-12-27 00:00:00 -- 2014-12-27 23:00:00 (n=24)
Fold: 27
Training: No training in this fold
Validation: 2014-12-28 00:00:00 -- 2014-12-28 23:00:00 (n=24)
Fold: 28
Training: No training in this fold
Validation: 2014-12-29 00:00:00 -- 2014-12-29 23:00:00 (n=24)
Fold: 29
Training: No training in this fold
Validation: 2014-12-30 00:00:00 -- 2014-12-30 23:00:00 (n=24)
# Plot predictions vs real value
# ======================================================================================
fig = go.Figure()
trace1 = go.Scatter(x=data_test.index, y=data_test['Demand'], name="test", mode="lines")
trace2 = go.Scatter(x=predictions.index, y=predictions['pred'], name="prediction", mode="lines")
fig.add_trace(trace1)
fig.add_trace(trace2)
fig.update_layout(
title="Real value vs predicted in test data",
xaxis_title="Date time",
yaxis_title="Demand",
width=800,
height=400,
margin=dict(l=20, r=20, t=35, b=20),
legend=dict(orientation="h", yanchor="top", y=1.01, xanchor="left", x=0)
)
fig.show()
# Backtesting error
# ==============================================================================
metric
| mean_absolute_error | |
|---|---|
| 0 | 225.521306 |
The autoregressive model achieves a lower MAE than the baseline model. This means that the autoregressive model is able to predict the next day's electricity demand more accurately than the baseline model.
Exogenous variables
So far, only lagged values of the time series have been used as predictors. However, it is possible to include other variables as predictors. These variables are known as exogenous variables (features) and their use can improve the predictive capacity of the model. A very important point to keep in mind is that the values of the exogenous variables must be known at the time of prediction.
Common examples of exogenous variables are those derived from the calendar, such as the day of the week, month, year, or holidays. Weather variables such as temperature, humidity, and wind also fall into this category, as do economic variables such as inflation and interest rates.
⚠️ Warning
Exogenous variables must be known at the time of the forecast. For example, if temperature is used as an exogenous variable, the temperature value for the next hour must be known at the time of the forecast. If the temperature value is not known, the forecast will not be possible.
Weather variables should be used with caution. When the model is deployed into production, future weather conditions are not known, but are predictions made by meteorological services. Because they are predictions, they introduce errors into the forecasting model. As a result, the model's predictions are likely to get worse. One way to anticipate this problem, and to know (not avoid) the expected performance of the model, is to use the weather forecasts available at the time the model is trained, rather than the recorded conditions.
Next, exogenous variables are created based on calendar information, sunrise and sunset times, temperature, and holidays. These new variables are then added to the training, validation and test sets, and used as predictors in the autoregressive model.
# Calendar features
# ==============================================================================
features_to_extract = [
'month',
'week',
'day_of_week',
'hour'
]
calendar_transformer = DatetimeFeatures(
variables = 'index',
features_to_extract = features_to_extract,
drop_original = True,
)
calendar_features = calendar_transformer.fit_transform(data)[features_to_extract]
# Sunlight features
# ==============================================================================
location = LocationInfo(
latitude = -37.8,
longitude = 144.95,
timezone = 'Australia/Melbourne'
)
sunrise_hour = [
sun(location.observer, date=date, tzinfo=location.timezone)['sunrise']
for date in data.index
]
sunset_hour = [
sun(location.observer, date=date, tzinfo=location.timezone)['sunset']
for date in data.index
]
sunrise_hour = pd.Series(sunrise_hour, index=data.index).dt.round("h").dt.hour
sunset_hour = pd.Series(sunset_hour, index=data.index).dt.round("h").dt.hour
sun_light_features = pd.DataFrame({
'sunrise_hour': sunrise_hour,
'sunset_hour': sunset_hour
})
sun_light_features['daylight_hours'] = (
sun_light_features['sunset_hour'] - sun_light_features['sunrise_hour']
)
sun_light_features["is_daylight"] = np.where(
(data.index.hour >= sun_light_features["sunrise_hour"])
& (data.index.hour < sun_light_features["sunset_hour"]),
1,
0,
)
# Holiday features
# ==============================================================================
holiday_features = data[['Holiday']].astype(int)
holiday_features['holiday_previous_day'] = holiday_features['Holiday'].shift(24)
holiday_features['holiday_next_day'] = holiday_features['Holiday'].shift(-24)
# Rolling windows of temperature
# ==============================================================================
wf_transformer = WindowFeatures(
variables = ["Temperature"],
window = ["1D", "7D"],
functions = ["mean", "max", "min"],
freq = "h",
)
temp_features = wf_transformer.fit_transform(data[['Temperature']])
# Merge all exogenous variables
# ==============================================================================
assert all(calendar_features.index == sun_light_features.index)
assert all(calendar_features.index == temp_features.index)
assert all(calendar_features.index == holiday_features.index)
exogenous_features = pd.concat([
calendar_features,
sun_light_features,
temp_features,
holiday_features
], axis=1)
# Due to the creation of moving averages, there are missing values at the beginning
# of the series. And due to holiday_next_day there are missing values at the end.
exogenous_features = exogenous_features.iloc[7 * 24:, :]
exogenous_features = exogenous_features.iloc[:-24, :]
exogenous_features.head(3)
| month | week | day_of_week | hour | sunrise_hour | sunset_hour | daylight_hours | is_daylight | Temperature | Temperature_window_1D_mean | Temperature_window_1D_max | Temperature_window_1D_min | Temperature_window_7D_mean | Temperature_window_7D_max | Temperature_window_7D_min | Holiday | holiday_previous_day | holiday_next_day | |
|---|---|---|---|---|---|---|---|---|---|---|---|---|---|---|---|---|---|---|
| Time | ||||||||||||||||||
| 2012-01-08 00:00:00 | 1 | 1 | 6 | 0 | 6 | 21 | 15 | 0 | 20.575 | 24.296875 | 29.0 | 19.875 | 23.254018 | 39.525 | 14.35 | 0 | 0.0 | 0.0 |
| 2012-01-08 01:00:00 | 1 | 1 | 6 | 1 | 6 | 21 | 15 | 0 | 22.500 | 24.098958 | 29.0 | 19.875 | 23.215774 | 39.525 | 14.35 | 0 | 0.0 | 0.0 |
| 2012-01-08 02:00:00 | 1 | 1 | 6 | 2 | 6 | 21 | 15 | 0 | 25.250 | 23.923958 | 29.0 | 19.875 | 23.173214 | 39.525 | 14.35 | 0 | 0.0 | 0.0 |
Certain aspects of the calendar, such as hours or days, are cyclical. For example, the hour-day cycle ranges from 0 to 23 hours. Although interpreted as a continuous variable, the hour 23:00 is only one hour away from 00:00. The same is true for the month-year cycle, since December is only one month away from January. The use of trigonometric functions such as sine and cosine transformations makes it possible to represent cyclic patterns and avoid inconsistencies in data representation. This approach is known as cyclic encoding and can significantly improve the predictive ability of models.
# Cliclical encoding of calendar and sunlight features
# ==============================================================================
features_to_encode = [
"month",
"week",
"day_of_week",
"hour",
"sunrise_hour",
"sunset_hour",
]
max_values = {
"month": 12,
"week": 52,
"day_of_week": 6,
"hour": 24,
"sunrise_hour": 24,
"sunset_hour": 24,
}
cyclical_encoder = CyclicalFeatures(
variables = features_to_encode,
max_values = max_values,
drop_original = False
)
exogenous_features = cyclical_encoder.fit_transform(exogenous_features)
exogenous_features.head(3)
| month | week | day_of_week | hour | sunrise_hour | sunset_hour | daylight_hours | is_daylight | Temperature | Temperature_window_1D_mean | ... | week_sin | week_cos | day_of_week_sin | day_of_week_cos | hour_sin | hour_cos | sunrise_hour_sin | sunrise_hour_cos | sunset_hour_sin | sunset_hour_cos | |
|---|---|---|---|---|---|---|---|---|---|---|---|---|---|---|---|---|---|---|---|---|---|
| Time | |||||||||||||||||||||
| 2012-01-08 00:00:00 | 1 | 1 | 6 | 0 | 6 | 21 | 15 | 0 | 20.575 | 24.296875 | ... | 0.120537 | 0.992709 | -2.449294e-16 | 1.0 | 0.000000 | 1.000000 | 1.0 | 6.123234e-17 | -0.707107 | 0.707107 |
| 2012-01-08 01:00:00 | 1 | 1 | 6 | 1 | 6 | 21 | 15 | 0 | 22.500 | 24.098958 | ... | 0.120537 | 0.992709 | -2.449294e-16 | 1.0 | 0.258819 | 0.965926 | 1.0 | 6.123234e-17 | -0.707107 | 0.707107 |
| 2012-01-08 02:00:00 | 1 | 1 | 6 | 2 | 6 | 21 | 15 | 0 | 25.250 | 23.923958 | ... | 0.120537 | 0.992709 | -2.449294e-16 | 1.0 | 0.500000 | 0.866025 | 1.0 | 6.123234e-17 | -0.707107 | 0.707107 |
3 rows × 30 columns
In many cases, exogenous variables are not isolated. Rather, their effect on the target variable depends on the value of other variables. For example, the effect of temperature on electricity demand depends on the time of day. The interaction between the exogenous variables can be captured by new variables that are obtained by multiplying existing variables together. This interactions are easily obtained with the PolynomialFeatures class from scikit-learn.
# Interaction between exogenous variables
# ==============================================================================
transformer_poly = PolynomialFeatures(
degree = 2,
interaction_only = True,
include_bias = False
).set_output(transform="pandas")
poly_cols = [
'month_sin',
'month_cos',
'week_sin',
'week_cos',
'day_of_week_sin',
'day_of_week_cos',
'hour_sin',
'hour_cos',
'sunrise_hour_sin',
'sunrise_hour_cos',
'sunset_hour_sin',
'sunset_hour_cos',
'daylight_hours',
'is_daylight',
'holiday_previous_day',
'holiday_next_day',
'Temperature_window_1D_mean',
'Temperature_window_1D_min',
'Temperature_window_1D_max',
'Temperature_window_7D_mean',
'Temperature_window_7D_min',
'Temperature_window_7D_max',
'Temperature',
'Holiday'
]
poly_features = transformer_poly.fit_transform(exogenous_features[poly_cols])
poly_features = poly_features.drop(columns=poly_cols)
poly_features.columns = [f"poly_{col}" for col in poly_features.columns]
poly_features.columns = poly_features.columns.str.replace(" ", "__")
assert all(poly_features.index == exogenous_features.index)
exogenous_features = pd.concat([exogenous_features, poly_features], axis=1)
exogenous_features.head(3)
| month | week | day_of_week | hour | sunrise_hour | sunset_hour | daylight_hours | is_daylight | Temperature | Temperature_window_1D_mean | ... | poly_Temperature_window_7D_mean__Temperature_window_7D_min | poly_Temperature_window_7D_mean__Temperature_window_7D_max | poly_Temperature_window_7D_mean__Temperature | poly_Temperature_window_7D_mean__Holiday | poly_Temperature_window_7D_min__Temperature_window_7D_max | poly_Temperature_window_7D_min__Temperature | poly_Temperature_window_7D_min__Holiday | poly_Temperature_window_7D_max__Temperature | poly_Temperature_window_7D_max__Holiday | poly_Temperature__Holiday | |
|---|---|---|---|---|---|---|---|---|---|---|---|---|---|---|---|---|---|---|---|---|---|
| Time | |||||||||||||||||||||
| 2012-01-08 00:00:00 | 1 | 1 | 6 | 0 | 6 | 21 | 15 | 0 | 20.575 | 24.296875 | ... | 333.695156 | 919.115056 | 478.451417 | 0.0 | 567.18375 | 295.25125 | 0.0 | 813.226875 | 0.0 | 0.0 |
| 2012-01-08 01:00:00 | 1 | 1 | 6 | 1 | 6 | 21 | 15 | 0 | 22.500 | 24.098958 | ... | 333.146354 | 917.603460 | 522.354911 | 0.0 | 567.18375 | 322.87500 | 0.0 | 889.312500 | 0.0 | 0.0 |
| 2012-01-08 02:00:00 | 1 | 1 | 6 | 2 | 6 | 21 | 15 | 0 | 25.250 | 23.923958 | ... | 332.535625 | 915.921295 | 585.123661 | 0.0 | 567.18375 | 362.33750 | 0.0 | 998.006250 | 0.0 | 0.0 |
3 rows × 306 columns
# Select exogenous variables to be included in the model
# ==============================================================================
exog_features = []
# Columns that ends with _sin or _cos are selected
exog_features.extend(exogenous_features.filter(regex='_sin$|_cos$').columns.tolist())
# Columns that start with temp_ are selected
exog_features.extend(exogenous_features.filter(regex='^Temperature_.*').columns.tolist())
# Columns that start with holiday_ are selected
exog_features.extend(exogenous_features.filter(regex='^Holiday_.*').columns.tolist())
# Include original features
exog_features.extend(['Temperature', 'Holiday'])
# Merge target and exogenous variables in the same DataFrame
# ==============================================================================
data = data[['Demand']].merge(
exogenous_features[exog_features],
left_index = True,
right_index = True,
how = 'inner' # Use only dates for which we have all the variables
)
data = data.astype('float32')
# Split data into train-val-test
data_train = data.loc[: end_train, :].copy()
data_val = data.loc[end_train:end_validation, :].copy()
data_test = data.loc[end_validation:, :].copy()
The model is backtested again, but this time, the exogenous variables are also included as predictors.
# Backtesting model
# ==============================================================================
metric, predictions = backtesting_forecaster(
forecaster = forecaster,
y = data['Demand'],
exog = data[exog_features],
cv = cv,
metric = 'mean_absolute_error'
)
display(metric)
predictions.head()
| mean_absolute_error | |
|---|---|
| 0 | 141.615022 |
| fold | pred | |
|---|---|---|
| 2014-12-08 00:00:00 | 0 | 4973.909908 |
| 2014-12-08 01:00:00 | 0 | 4976.217860 |
| 2014-12-08 02:00:00 | 0 | 4987.034012 |
| 2014-12-08 03:00:00 | 0 | 5007.016313 |
| 2014-12-08 04:00:00 | 0 | 5027.765102 |
The inclusion of exogenous variables as predictors improves the predictive capacity of the model.
Hyperparameter tuning
The trained ForecasterRecursive object used the first 24 lags and a LGMBRegressor model with the default hyperparameters. However, there is no reason why these values are the most appropriate. To find the best hyperparameters, a Bayesian Search is performed using the bayesian_search_forecaster function. The search is carried out using the same backtesting process as before, but each time, the model is trained with different combinations of hyperparameters and lags. It is important to note that the hiperparameter search must be done using the validation set, so the test data is never used.
💡 Tip
Searching for hyperparameters can take a long time, especially when using a validation strategy based on backtesting (TimeSeriesFold). A faster alternative is to use a validation strategy based on one-step-ahead predictions (OneStepAheadFold). Although this strategy is faster, it may not be as accurate as validation based on backtesting. For a more detailed description of the pros and cons of each strategy, see the section backtesting vs one-step-ahead.
# Hyperparameters search
# ==============================================================================
forecaster = ForecasterRecursive(
estimator = LGBMRegressor(random_state=15926, verbose=-1),
lags = 24, # This value will be replaced in the grid search
window_features = window_features
)
# Lags used as predictors
lags_grid = [24, (1, 2, 3, 23, 24, 25, 47, 48, 49)]
# Estimator hyperparameters search space
def search_space(trial):
search_space = {
'n_estimators' : trial.suggest_int('n_estimators', 300, 1000, step=100),
'max_depth' : trial.suggest_int('max_depth', 3, 10),
'learning_rate': trial.suggest_float('learning_rate', 0.01, 0.5),
'reg_alpha' : trial.suggest_float('reg_alpha', 0, 1),
'reg_lambda' : trial.suggest_float('reg_lambda', 0, 1),
'lags' : trial.suggest_categorical('lags', lags_grid)
}
return search_space
# Folds training and validation
cv_search = TimeSeriesFold(
steps = 24,
initial_train_size = len(data[:end_train]),
refit = False,
)
results_search, frozen_trial = bayesian_search_forecaster(
forecaster = forecaster,
y = data.loc[:end_validation, 'Demand'],
exog = data.loc[:end_validation, exog_features],
cv = cv_search,
metric = 'mean_absolute_error',
search_space = search_space,
n_trials = 10, # Increase for more exhaustive search
return_best = True
)
# Search results
# ==============================================================================
best_params = results_search.at[0, 'params']
best_params = best_params | {'random_state': 15926, 'verbose': -1}
best_lags = results_search.at[0, 'lags']
results_search.head(3)
| trial_number | lags | params | mean_absolute_error | n_estimators | max_depth | learning_rate | reg_alpha | reg_lambda | |
|---|---|---|---|---|---|---|---|---|---|
| 0 | 9 | [1, 2, 3, 23, 24, 25, 47, 48, 49] | {'n_estimators': 800, 'max_depth': 9, 'learnin... | 128.290254 | 800.0 | 9.0 | 0.050766 | 0.763683 | 0.243666 |
| 1 | 0 | [1, 2, 3, 23, 24, 25, 47, 48, 49] | {'n_estimators': 800, 'max_depth': 5, 'learnin... | 129.402763 | 800.0 | 5.0 | 0.121157 | 0.551315 | 0.719469 |
| 2 | 2 | [1, 2, 3, 23, 24, 25, 47, 48, 49] | {'n_estimators': 600, 'max_depth': 8, 'learnin... | 130.719469 | 600.0 | 8.0 | 0.099421 | 0.175452 | 0.531551 |
Since return_best has been set to True, the forecaster object is automatically updated with the best configuration found and trained on the entire dataset. This final model can then be used for future predictions on new data.
# Best model
# ==============================================================================
forecaster
ForecasterRecursive
General Information
- Estimator: LGBMRegressor
- Lags: [ 1 2 3 23 24 25 47 48 49]
- Window features: ['roll_mean_72']
- Window size: 72
- Series name: Demand
- Exogenous included: True
- Categorical features: auto
- Weight function included: False
- Differentiation order: None
- Drop NaN from series: False
- Creation date: 2026-05-03 12:36:11
- Last fit date: 2026-05-03 12:36:42
- Skforecast version: 0.22.0
- Python version: 3.12.13
- Forecaster id: None
Exogenous Variables
month_sin, month_cos, week_sin, week_cos, day_of_week_sin, day_of_week_cos, hour_sin, hour_cos, sunrise_hour_sin, sunrise_hour_cos, sunset_hour_sin, sunset_hour_cos, poly_month_sin__month_cos, poly_month_sin__week_sin, poly_month_sin__week_cos, poly_month_sin__day_of_week_sin, poly_month_sin__day_of_week_cos, poly_month_sin__hour_sin, poly_month_sin__hour_cos, poly_month_sin__sunrise_hour_sin, poly_month_sin__sunrise_hour_cos, poly_month_sin__sunset_hour_sin, poly_month_sin__sunset_hour_cos, poly_month_cos__week_sin, poly_month_cos__week_cos, …, poly_day_of_week_cos__sunset_hour_sin, poly_day_of_week_cos__sunset_hour_cos, poly_hour_sin__hour_cos, poly_hour_sin__sunrise_hour_sin, poly_hour_sin__sunrise_hour_cos, poly_hour_sin__sunset_hour_sin, poly_hour_sin__sunset_hour_cos, poly_hour_cos__sunrise_hour_sin, poly_hour_cos__sunrise_hour_cos, poly_hour_cos__sunset_hour_sin, poly_hour_cos__sunset_hour_cos, poly_sunrise_hour_sin__sunrise_hour_cos, poly_sunrise_hour_sin__sunset_hour_sin, poly_sunrise_hour_sin__sunset_hour_cos, poly_sunrise_hour_cos__sunset_hour_sin, poly_sunrise_hour_cos__sunset_hour_cos, poly_sunset_hour_sin__sunset_hour_cos, Temperature_window_1D_mean, Temperature_window_1D_max, Temperature_window_1D_min, Temperature_window_7D_mean, Temperature_window_7D_max, Temperature_window_7D_min, Temperature, Holiday
Data Transformations
- Transformer for y: None
- Transformer for exog: None
Training Information
- Training range: [Timestamp('2012-01-08 00:00:00'), Timestamp('2014-11-30 23:00:00')]
- Training index type: DatetimeIndex
- Training index frequency:
Estimator Parameters
-
{'boosting_type': 'gbdt', 'class_weight': None, 'colsample_bytree': 1.0, 'importance_type': 'split', 'learning_rate': 0.050765544282894995, 'max_depth': 9, 'min_child_samples': 20, 'min_child_weight': 0.001, 'min_split_gain': 0.0, 'n_estimators': 800, 'n_jobs': None, 'num_leaves': 31, 'objective': None, 'random_state': 15926, 'reg_alpha': 0.7636828414433382, 'reg_lambda': 0.243666374536874, 'subsample': 1.0, 'subsample_for_bin': 200000, 'subsample_freq': 0, 'verbose': -1}
Fit Kwargs
-
{}
Once the best combination of hyperparameters has been identified using the validation data, the predictive capacity of the model is evaluated when applied to the test set.
# Backtest final model on test data
# ==============================================================================
metric, predictions = backtesting_forecaster(
forecaster = forecaster,
y = data['Demand'],
exog = data[exog_features],
cv = cv,
metric = 'mean_absolute_error'
)
display(metric)
predictions.head()
| mean_absolute_error | |
|---|---|
| 0 | 132.742342 |
| fold | pred | |
|---|---|---|
| 2014-12-08 00:00:00 | 0 | 4975.449681 |
| 2014-12-08 01:00:00 | 0 | 5002.267029 |
| 2014-12-08 02:00:00 | 0 | 5025.141643 |
| 2014-12-08 03:00:00 | 0 | 5057.270548 |
| 2014-12-08 04:00:00 | 0 | 5087.195752 |
After optimization of lags and hyperparameters, the prediction error was reduced.
Feature selection
Feature selection is the process of selecting a subset of relevant features for use in model construction. It is an important step in the machine learning process, as it can help to reduce overfitting, improve model accuracy, and reduce training time. Since the underlying regressors of skforecast follow the scikit-learn API, it is possible to apply the feature selection methods available in scikit-learn with the functionselect_features. Two of the most popular methods are Recursive Feature Elimination and Sequential Feature Selection.
💡 Tip
Feature selection is a powerful tool for improving the performance of machine learning models. However, it is computationally expensive and can be time-consuming. Since the goal is to find the best subset of features, not the best model, it is not necessary to use the entire data set or a highly complex model. Instead, it is recommended to use a small subset of the data and a simple model. Once the best subset of features has been identified, the model can then be trained using the entire dataset and a more complex configuration.
# Create forecaster
# ==============================================================================
estimator = LGBMRegressor(
n_estimators = 100,
max_depth = 4,
random_state = 15926,
verbose = -1
)
forecaster = ForecasterRecursive(
estimator = estimator,
lags = best_lags,
window_features = window_features
)
# Recursive feature elimination with cross-validation
# ==============================================================================
warnings.filterwarnings("ignore", message="X does not have valid feature names.*")
selector = RFECV(
estimator = estimator,
step = 1,
cv = 3,
)
lags_select, window_features_select, exog_select = select_features(
forecaster = forecaster,
selector = selector,
y = data_train['Demand'],
exog = data_train[exog_features],
select_only = None,
force_inclusion = None,
subsample = 0.5, # Subsample to speed up the process
random_state = 123,
verbose = True,
)
Recursive feature elimination (RFECV)
-------------------------------------
Total number of records available: 17304
Total number of records used for feature selection: 8652
Number of features available: 96
Lags (n=9)
Window features (n=1)
Exog (n=86)
Number of features selected: 45
Lags (n=9) : [1, 2, 3, 23, 24, 25, 47, 48, 49]
Window features (n=1) : ['roll_mean_72']
Exog (n=35) : ['week_cos', 'hour_sin', 'hour_cos', 'poly_month_sin__day_of_week_cos', 'poly_month_sin__hour_cos', 'poly_month_cos__hour_cos', 'poly_week_sin__hour_sin', 'poly_week_sin__hour_cos', 'poly_week_cos__day_of_week_sin', 'poly_week_cos__day_of_week_cos', 'poly_week_cos__hour_sin', 'poly_week_cos__hour_cos', 'poly_day_of_week_sin__day_of_week_cos', 'poly_day_of_week_sin__hour_sin', 'poly_day_of_week_sin__hour_cos', 'poly_day_of_week_sin__sunrise_hour_sin', 'poly_day_of_week_cos__hour_sin', 'poly_day_of_week_cos__hour_cos', 'poly_day_of_week_cos__sunrise_hour_cos', 'poly_hour_sin__hour_cos', 'poly_hour_sin__sunrise_hour_cos', 'poly_hour_sin__sunset_hour_sin', 'poly_hour_sin__sunset_hour_cos', 'poly_hour_cos__sunrise_hour_sin', 'poly_hour_cos__sunrise_hour_cos', 'poly_hour_cos__sunset_hour_sin', 'poly_hour_cos__sunset_hour_cos', 'Temperature_window_1D_mean', 'Temperature_window_1D_max', 'Temperature_window_1D_min', 'Temperature_window_7D_mean', 'Temperature_window_7D_max', 'Temperature_window_7D_min', 'Temperature', 'Holiday']
Scikit-learn's RFECV starts by training a model on the initial set of features, and obtaining the importance of each feature (through attributes such as coef_ or feature_importances_). Then, in each round, the least important features are iteratively removed, followed by cross-validation to calculate the performance of the model with the remaining features. This process continues until further feature removal doesn't improve or starts to degrade the performance of the model (based on a chosen metric), or the min_features_to_select is reached.
The final result is an optimal subset of features that ideally balances model simplicity and predictive power, as determined by the cross-validation process.
The forecaster is trained and re-evaluated using the best subset of features.
# Create a forecaster with the selected features
# ==============================================================================
forecaster = ForecasterRecursive(
estimator = LGBMRegressor(**best_params),
lags = lags_select,
window_features = window_features
)
# Backtesting model with exogenous variables on test data
# ==============================================================================
metric, predictions = backtesting_forecaster(
forecaster = forecaster,
y = data['Demand'],
exog = data[exog_select],
cv = cv,
metric = 'mean_absolute_error'
)
metric
| mean_absolute_error | |
|---|---|
| 0 | 131.391247 |
The number of predictors has been reduced without compromising the performance of the model. This simplifies the model and speeds up training. It also reduces the risk of overfitting because the model is less likely to learn irrelevant feature noise.
Probabilistic forecasting: Prediction intervals
A prediction interval defines the interval within which the true value of the target variable can be expected to be found with a given probability. Skforecast implements several methods for probabilistic forecasting:
The following code shows how to generate prediction intervals for the autoregressive model. The prediction_interval() function is used to generate the prediction intervals for each predicted step. Then, the backtesting_forecaster() function is used to generate the prediction intervals for the entire test set. The interval argument is used to specify the desired coverage probability of the prediction intervals. In this case, interval is set to [5, 95], which means that the prediction intervals are calculated for the 5th and 95th percentiles, resulting in a theoretical coverage probability of 90%.
# Create and train forecaster
# ==============================================================================
forecaster = ForecasterRecursive(
estimator = LGBMRegressor(**best_params),
lags = lags_select,
window_features = window_features,
binner_kwargs = {"n_bins": 5}
)
forecaster.fit(
y = data.loc[:end_train, 'Demand'],
exog = data.loc[:end_train, exog_select],
store_in_sample_residuals = True
)
# Predict intervals
# ==============================================================================
# Since the model has been trained with exogenous variables, they must be provided
# for the prediction.
predictions = forecaster.predict_interval(
exog = data.loc[end_train:, exog_select],
steps = 24,
interval = [5, 95],
method = 'conformal',
)
predictions.head()
| pred | lower_bound | upper_bound | |
|---|---|---|---|
| 2014-01-01 00:00:00 | 3659.284654 | 3619.432029 | 3699.137278 |
| 2014-01-01 01:00:00 | 3809.478172 | 3769.625548 | 3849.330797 |
| 2014-01-01 02:00:00 | 3941.153515 | 3895.670015 | 3986.637016 |
| 2014-01-01 03:00:00 | 3973.933981 | 3928.450480 | 4019.417482 |
| 2014-01-01 04:00:00 | 4062.377324 | 4016.893823 | 4107.860824 |
By default, intervals are calculated using in-sample residuals (residuals from the training set). However, this can result in intervals that are too narrow (overly optimistic). To avoid this, the set_out_sample_residuals() method is used to specify out-sample residuals computed with a validation set through backtesting.
If the predicted values are passed to set_out_sample_residuals() in addition to the residuals, then the residuals used in the bootstrapping process can be conditioned on the range of values of the predictions. This can help to improve the coverage of the estimated intervals while keeping them as narrow as possible.
# Backtesting on validation data to obtain out-sample residuals
# ==============================================================================
cv = TimeSeriesFold(
steps = 24,
initial_train_size = len(data.loc[:end_train]),
refit = False,
)
_, predictions_val = backtesting_forecaster(
forecaster = forecaster,
y = data.loc[:end_validation, 'Demand'],
exog = data.loc[:end_validation, exog_select],
cv = cv,
metric = 'mean_absolute_error'
)
# Out-sample residuals distribution
# ==============================================================================
residuals = data.loc[predictions_val.index, 'Demand'] - predictions_val['pred']
print(pd.Series(np.where(residuals < 0, 'negative', 'positive')).value_counts())
plt.rcParams.update({'font.size': 8})
_ = plot_residuals(residuals=residuals, figsize=(7, 4))
negative 4429 positive 3587 Name: count, dtype: int64

# Store out-sample residuals in the forecaster
# ==============================================================================
forecaster.set_out_sample_residuals(
y_true = data.loc[predictions_val.index, 'Demand'],
y_pred = predictions_val['pred']
)
The backtesting process is then run to estimate the prediction intervals in the test set. The argument use_in_sample_residuals is set to False so that the previously stored out-sample residuals are used and use_binned_residuals so that the residuals used in bootstrapping are selected conditional on the range of prediction values.
# Backtesting with prediction intervals in test data using out-sample residuals
# ==============================================================================
cv = TimeSeriesFold(
steps = 24,
initial_train_size = len(data.loc[:end_validation]),
refit = False,
)
metric, predictions = backtesting_forecaster(
forecaster = forecaster,
y = data['Demand'],
exog = data[exog_select],
cv = cv,
metric = 'mean_absolute_error',
interval = [5, 95],
interval_method = 'conformal',
use_in_sample_residuals = False, # out-sample residuals
use_binned_residuals = True, # Intervals conditioned to the predicted values
)
predictions.head(5)
| fold | pred | lower_bound | upper_bound | |
|---|---|---|---|---|
| 2014-12-01 00:00:00 | 0 | 5609.728357 | 5141.917122 | 6077.539593 |
| 2014-12-01 01:00:00 | 0 | 5570.278476 | 5102.467241 | 6038.089711 |
| 2014-12-01 02:00:00 | 0 | 5557.446741 | 5089.635506 | 6025.257976 |
| 2014-12-01 03:00:00 | 0 | 5574.087926 | 5106.276691 | 6041.899161 |
| 2014-12-01 04:00:00 | 0 | 5655.740166 | 5187.928931 | 6123.551402 |
# Plot prediction intervals vs real value
# ==============================================================================
fig = go.Figure([
go.Scatter(
name='Prediction', x=predictions.index, y=predictions['pred'], mode='lines',
),
go.Scatter(
name='Real value', x=data_test.index, y=data_test['Demand'], mode='lines',
),
go.Scatter(
name='Upper Bound', x=predictions.index, y=predictions['upper_bound'],
mode='lines', marker=dict(color="#444"), line=dict(width=0), showlegend=False
),
go.Scatter(
name='Lower Bound', x=predictions.index, y=predictions['lower_bound'],
marker=dict(color="#444"), line=dict(width=0), mode='lines',
fillcolor='rgba(68, 68, 68, 0.3)', fill='tonexty', showlegend=False
)
])
fig.update_layout(
title="Real value vs predicted in test data",
xaxis_title="Date time",
yaxis_title="Demand",
width=800,
height=400,
margin=dict(l=20, r=20, t=35, b=20),
hovermode="x",
legend=dict(orientation="h", yanchor="top", y=1.1, xanchor="left", x=0.001)
)
fig.show()
# Predicted interval coverage (on test data)
# ==============================================================================
coverage = calculate_coverage(
y_true = data.loc[end_validation:, "Demand"],
lower_bound = predictions["lower_bound"],
upper_bound = predictions["upper_bound"]
)
area = (predictions['upper_bound'] - predictions['lower_bound']).sum()
print(f"Total area of the interval: {round(area, 2)}")
print(f"Predicted interval coverage: {round(100 * coverage, 2)} %")
Total area of the interval: 335515.26 Predicted interval coverage: 86.64 %
The observed coverage of the intervals is close to the theoretically expected coverage (90%).
✏️ Note
For a more detailed explanation of the probabilistic forecasting features available in skforecast visit: Probabilistic forecasting with machine learning.
Model explanaibility and interpretability
Due to the complex nature of many modern machine learning models, such as ensemble methods, they often function as black boxes, making it difficult to understand why a particular prediction was made. Explanability techniques aim to demystify these models, providing insight into their inner workings and helping to build trust, improve transparency, and meet regulatory requirements in various domains. Enhancing model explainability not only helps to understand model behavior, but also helps to identify biases, improve model performance, and enable stakeholders to make more informed decisions based on machine learning insights.
Skforecast is compatible with some of the most popular model explainability methods: model-specific feature importances, SHAP values, and partial dependence plots.
# Create and train forecaster
# ==============================================================================
forecaster = ForecasterRecursive(
estimator = LGBMRegressor(**best_params),
lags = lags_select,
window_features = window_features
)
forecaster.fit(
y = data.loc[:end_validation, 'Demand'],
exog = data.loc[:end_validation, exog_select]
)
Model-specific feature importance
# Model-specific feature importances
# ==============================================================================
feature_importances = forecaster.get_feature_importances()
feature_importances.head(10)
| feature | importance | |
|---|---|---|
| 0 | lag_1 | 2279 |
| 43 | Temperature | 1285 |
| 1 | lag_2 | 1167 |
| 5 | lag_25 | 1111 |
| 2 | lag_3 | 1047 |
| 4 | lag_24 | 975 |
| 3 | lag_23 | 757 |
| 39 | Temperature_window_1D_min | 713 |
| 38 | Temperature_window_1D_max | 689 |
| 29 | poly_hour_sin__hour_cos | 683 |
⚠️ Warning
The get_feature_importances() method will only return values if the forecaster's estimator has either the coef_ or feature_importances_ attribute, which is the default in scikit-learn.
Shap values
SHAP (SHapley Additive exPlanations) values are a popular method for explaining machine learning models, as they help to understand how variables and values influence predictions visually and quantitatively.
It is possible to generate SHAP-values explanations from skforecast models with just two essential elements:
The internal estimator of the forecaster.
The training matrices created from the time series and exogenous features, used to fit the forecaster.
By leveraging these two components, users can create insightful and interpretable explanations for their skforecast models. These explanations can be used to verify the reliability of the model, identify the most significant factors that contribute to model predictions, and gain a deeper understanding of the underlying relationship between the input variables and the target variable.
# Training matrices used by the forecaster to fit the internal estimator
# ==============================================================================
X_train, y_train = forecaster.create_train_X_y(
y = data_train['Demand'],
exog = data_train[exog_select]
)
display(X_train.head(3))
display(y_train.head(3))
| lag_1 | lag_2 | lag_3 | lag_23 | lag_24 | lag_25 | lag_47 | lag_48 | lag_49 | roll_mean_72 | ... | poly_hour_cos__sunset_hour_sin | poly_hour_cos__sunset_hour_cos | Temperature_window_1D_mean | Temperature_window_1D_max | Temperature_window_1D_min | Temperature_window_7D_mean | Temperature_window_7D_max | Temperature_window_7D_min | Temperature | Holiday | |
|---|---|---|---|---|---|---|---|---|---|---|---|---|---|---|---|---|---|---|---|---|---|
| Time | |||||||||||||||||||||
| 2012-01-11 00:00:00 | 5087.274902 | 4925.770996 | 4661.530762 | 4988.975098 | 4963.185059 | 4896.571289 | 5039.643066 | 4958.630371 | 4886.074219 | 4386.356154 | ... | -0.707107 | 0.707107 | 16.140625 | 19.575001 | 13.175 | 19.321875 | 29.0 | 13.175 | 15.150 | 0.0 |
| 2012-01-11 01:00:00 | 5107.675781 | 5087.274902 | 4925.770996 | 5006.663086 | 4988.975098 | 4963.185059 | 5090.203125 | 5039.643066 | 4958.630371 | 4398.891398 | ... | -0.683013 | 0.683013 | 16.042707 | 19.575001 | 13.175 | 19.291666 | 29.0 | 13.175 | 15.425 | 0.0 |
| 2012-01-11 02:00:00 | 5126.337891 | 5107.675781 | 5087.274902 | 4977.723633 | 5006.663086 | 4988.975098 | 5108.837402 | 5090.203125 | 5039.643066 | 4410.526191 | ... | -0.612372 | 0.612372 | 15.939584 | 19.575001 | 13.175 | 19.255507 | 29.0 | 13.175 | 14.800 | 0.0 |
3 rows × 45 columns
Time 2012-01-11 00:00:00 5107.675781 2012-01-11 01:00:00 5126.337891 2012-01-11 02:00:00 5103.370605 Freq: h, Name: y, dtype: float32
# Create SHAP explainer (for three base models)
# ==============================================================================
shap.initjs()
explainer = shap.TreeExplainer(forecaster.estimator)
# Sample 50% of the data to speed up the calculation
rng = np.random.default_rng(seed=785412)
sample = rng.choice(X_train.index, size=int(len(X_train)*0.5), replace=False)
X_train_sample = X_train.loc[sample, :]
shap_values = explainer.shap_values(X_train_sample)

✏️ Note
Shap library has several explainers, each designed for a different type of model. The shap.TreeExplainer explainer is used for tree-based models, such as the LGBMRegressor used in this example. For more information, see the SHAP documentation.
# Shap summary plot (top 10)
# ==============================================================================
shap.summary_plot(shap_values, X_train_sample, max_display=10, show=False)
fig, ax = plt.gcf(), plt.gca()
ax.set_title("SHAP Summary plot")
ax.tick_params(labelsize=8)
fig.set_size_inches(6, 4.5)

SHAP values not only allow for interpreting the general behavior of the model but also serve as a powerful tool for analyzing individual predictions. This is especially useful when trying to understand how a specific prediction was made and which variables contributed to it.
To carry out this analysis, it is necessary to access the predictor values — in this case, the lags — at the time of the prediction. This can be achieved by using the create_predict_X method or by enabling the return_predictors=True argument in the backtesting_forecaster function.
Suppose one wants to understand the prediction obtained during the backtesting for the date 2014-12-16 05:00:00.
# Backtesting returning the predictors
# ==============================================================================
cv = TimeSeriesFold(
steps = 24,
initial_train_size = len(data.loc[:end_validation]),
)
_, predictions = backtesting_forecaster(
forecaster = forecaster,
y = data['Demand'],
exog = data[exog_select],
cv = cv,
metric = 'mean_absolute_error',
return_predictors = True,
)
By setting return_predictors=True, a DataFrame is obtained with the predicted value ('pred'), the partition it belongs to ('fold'), and the value of the lags and exogenous variables used to make each prediction.
predictions.head(3)
| fold | pred | lag_1 | lag_2 | lag_3 | lag_23 | lag_24 | lag_25 | lag_47 | lag_48 | ... | poly_hour_cos__sunset_hour_sin | poly_hour_cos__sunset_hour_cos | Temperature_window_1D_mean | Temperature_window_1D_max | Temperature_window_1D_min | Temperature_window_7D_mean | Temperature_window_7D_max | Temperature_window_7D_min | Temperature | Holiday | |
|---|---|---|---|---|---|---|---|---|---|---|---|---|---|---|---|---|---|---|---|---|---|
| 2014-12-01 00:00:00 | 0 | 5609.728357 | 5634.690430 | 5519.464844 | 5250.484863 | 4326.276855 | 4102.013672 | 3851.330322 | 4056.273926 | 4058.317627 | ... | -0.866025 | 0.500000 | 28.779167 | 33.849998 | 23.6 | 18.208036 | 33.849998 | 11.15 | 20.000000 | 0.0 |
| 2014-12-01 01:00:00 | 0 | 5570.278476 | 5609.728357 | 5634.690430 | 5519.464844 | 4560.871094 | 4326.276855 | 4102.013672 | 4060.130127 | 4056.273926 | ... | -0.836516 | 0.482963 | 28.556250 | 33.849998 | 20.0 | 18.224703 | 33.849998 | 11.15 | 20.350000 | 0.0 |
| 2014-12-01 02:00:00 | 0 | 5557.446741 | 5570.278476 | 5609.728357 | 5634.690430 | 4782.341309 | 4560.871094 | 4326.276855 | 4071.491943 | 4060.130127 | ... | -0.750000 | 0.433013 | 28.193750 | 33.849998 | 20.0 | 18.242857 | 33.849998 | 11.15 | 22.299999 | 0.0 |
3 rows × 47 columns
# Waterfall for a single prediction generated during backtesting
# ==============================================================================
predictions = predictions.astype(data[exog_select].dtypes) # Ensure that the types are the same
iloc_predicted_date = predictions.index.get_loc('2014-12-16 12:00:00')
shap_values_single = explainer(predictions.iloc[:, 2:])
shap.plots.waterfall(shap_values_single[iloc_predicted_date], show=False)
fig, ax = plt.gcf(), plt.gca()
fig.set_size_inches(8, 3.5)
ax_list = fig.axes
ax = ax_list[0]
ax.tick_params(labelsize=8)
ax.set
plt.show()

# Forceplot for a single prediction generated during backtesting
# ==============================================================================
shap.force_plot(
base_value = shap_values_single.base_values[iloc_predicted_date],
shap_values = shap_values_single.values[iloc_predicted_date],
features = predictions.iloc[iloc_predicted_date, 2:],
)
Have you run `initjs()` in this notebook? If this notebook was from another user you must also trust this notebook (File -> Trust notebook). If you are viewing this notebook on github the Javascript has been stripped for security. If you are using JupyterLab this error is because a JupyterLab extension has not yet been written.
Direct multi-step forecasting
The ForecasterRecursive and ForecasterRecursiveCustom models follow a recursive strategy in which each new prediction is based on the previous one. Another strategy for multi-step forecasting involves training a separate model for each step to be predicted. This is known as direct multi-step forecasting and, although more computationally expensive than the recursive approach due to the need to train multiple models, it may yield better results.
# Forecaster with direct method
# ==============================================================================
forecaster = ForecasterDirect(
estimator = LGBMRegressor(**best_params),
steps = 24,
lags = lags_select,
window_features = window_features
)
# Backtesting model
# ==============================================================================
metric, predictions = backtesting_forecaster(
forecaster = forecaster,
y = data['Demand'],
exog = data[exog_select],
cv = cv,
metric = 'mean_absolute_error'
)
display(metric)
predictions.head()
| mean_absolute_error | |
|---|---|
| 0 | 119.096333 |
| fold | pred | |
|---|---|---|
| 2014-12-01 00:00:00 | 0 | 5643.441883 |
| 2014-12-01 01:00:00 | 0 | 5770.005014 |
| 2014-12-01 02:00:00 | 0 | 5844.018982 |
| 2014-12-01 03:00:00 | 0 | 6144.759526 |
| 2014-12-01 04:00:00 | 0 | 6105.915435 |
The direct multi-step forecasting model outperforms the predictive capability of the recursive model, further reducing the mean absolute error. However, it is important to keep in mind its higher computational cost in assessing whether it is worth implementing.
Anticipated daily forecast
So far, we have evaluated the model under the assumption that the forecasts for the next day are generated at exactly 11:59 PM each day. However, this approach is impractical because there is no time to manage the early hours of the next day.
Now, suppose that the predictions for the next day need to be made at 11:00 AM each day to allow enough time. This means that at 11:00 on day $D$ you have to forecast the hours [12, 13, 14, 15, 16, 17, 18, 19, 20, 21, 22, 23] of the same day and the hours [0, 1, 2, 3, 4, 5, 6, 7, 8, 9, 10, 11, 12, 13, 14, 15, 16, 17, 18, 19, 20, 21, 22, 23] of day $D+1$. This means that a total of 36 hours into the future have to be predicted, although only the last 24 hours have to be stored.
This type of evaluation can be easily done using the backtesting_forecaster() function and its gap argument. In addition, the allow_incomplete_fold argument allows the last fold to be excluded from the analysis if it does not have the same size as the required number of steps. The process adapted to this scenario is run on a daily basis and consists of the following steps:
At 11:00 a.m. on the first day of the test set, the next 36 hours (the remaining 12 hours of the day plus 24 hours of the following day) are predicted.
Only the forecasts for the next day are stored, i.e. starting from position 12.
The next day until 11:00 a.m. is added to the test set.
The process is repeated.
Thus, at 11:00 a.m. each day, the model has access to the actual demand values recorded up to that time.
⚠️ Warning
There are two considerations to take into account:
- Training data must end where the gap begins. In this case, the
initial_train_sizemust be extended by 12 positions so that the first point to be predicted is 2014-12-01 12:00:00. - In this example, although only the last 24 predictions (steps) are stored for model evaluation, the total number of predicted steps in each fold is 36 (steps + gap).
# End of initial_train_size + 12 positions
# ==============================================================================
data.iloc[:len(data.loc[:end_validation]) + 12].tail(2)
| Demand | month_sin | month_cos | week_sin | week_cos | day_of_week_sin | day_of_week_cos | hour_sin | hour_cos | sunrise_hour_sin | ... | poly_sunrise_hour_cos__sunset_hour_cos | poly_sunset_hour_sin__sunset_hour_cos | Temperature_window_1D_mean | Temperature_window_1D_max | Temperature_window_1D_min | Temperature_window_7D_mean | Temperature_window_7D_max | Temperature_window_7D_min | Temperature | Holiday | |
|---|---|---|---|---|---|---|---|---|---|---|---|---|---|---|---|---|---|---|---|---|---|
| Time | |||||||||||||||||||||
| 2014-12-01 10:00:00 | 5084.011230 | -2.449294e-16 | 1.0 | -0.354605 | 0.935016 | 0.0 | 1.0 | 0.500000 | -0.866025 | 1.0 | ... | 3.061617e-17 | -0.433013 | 25.589582 | 30.950001 | 20.0 | 18.573214 | 33.849998 | 11.15 | 19.90 | 0.0 |
| 2014-12-01 11:00:00 | 4851.066895 | -2.449294e-16 | 1.0 | -0.354605 | 0.935016 | 0.0 | 1.0 | 0.258819 | -0.965926 | 1.0 | ... | 3.061617e-17 | -0.433013 | 25.129168 | 29.500000 | 19.9 | 18.601191 | 33.849998 | 11.15 | 19.35 | 0.0 |
2 rows × 87 columns
# Forecaster
# ==============================================================================
forecaster = ForecasterRecursive(
estimator = LGBMRegressor(**best_params),
lags = lags_select,
window_features = window_features
)
# Backtesting with gap
# ==============================================================================
cv = TimeSeriesFold(
steps = 24,
initial_train_size = len(data.loc[:end_validation]) + 12,
refit = False,
gap = 12,
)
metric, predictions = backtesting_forecaster(
forecaster = forecaster,
y = data['Demand'],
exog = data[exog_select],
cv = cv,
metric = 'mean_absolute_error'
)
display(metric)
predictions.head(5)
| mean_absolute_error | |
|---|---|
| 0 | 138.496187 |
| fold | pred | |
|---|---|---|
| 2014-12-02 00:00:00 | 0 | 5459.348705 |
| 2014-12-02 01:00:00 | 0 | 5506.327848 |
| 2014-12-02 02:00:00 | 0 | 5590.533606 |
| 2014-12-02 03:00:00 | 0 | 5688.215164 |
| 2014-12-02 04:00:00 | 0 | 5835.673206 |
As expected, the error increases as the forecast horizon increases from 24 to 36 hours.
Conclusions
The use of gradient boosting models has proven to be a powerful tool for forecasting energy demand. One of the main advantages of these models is that they can easily incorporate exogenous variables, which can significantly improve the predictive power of the model. In addition, the use of explicability techniques can help to visually and quantitatively understand how variables and values affect predictions. All of these issues are easily addressed using the skforecast library.
| Forecaster | Exogenous Variables | MAE backtest |
|---|---|---|
ForecasterEquivalentDate (Baseline) |
False | 308.4 |
ForecasterRecursive |
False | 225.5 |
ForecasterRecursive |
True | 132.7 |
ForecasterRecursive |
True (Feature Selection) | 131.9 |
ForecasterDirect |
True (Feature Selection) | 119.1 |
Session information
import session_info
session_info.show(html=False)
----- astral 3.2 feature_engine 1.9.4 lightgbm 4.6.0 matplotlib 3.10.8 numpy 2.1.3 optuna 4.8.0 pandas 2.3.3 plotly 6.7.0 session_info v1.0.1 shap 0.51.0 skforecast 0.22.0 sklearn 1.7.2 statsmodels 0.14.6 ----- IPython 9.12.0 jupyter_client 8.8.0 jupyter_core 5.9.1 ----- Python 3.12.13 | packaged by conda-forge | (main, Mar 5 2026, 16:36:12) [MSC v.1944 64 bit (AMD64)] Windows-11-10.0.26200-SP0 ----- Session information updated at 2026-05-03 12:38
Citation
How to cite this document
If you use this document or any part of it, please acknowledge the source, thank you!
Forecasting energy demand with machine learning by Joaquín Amat Rodrigo and Javier Escobar Ortiz, available under Attribution-NonCommercial-ShareAlike 4.0 International (CC BY-NC-SA 4.0 DEED) at https://www.cienciadedatos.net/documentos/py29-forecasting-electricity-power-demand-python.html
How to cite skforecast
If you use skforecast for a publication, we would appreciate it if you cite the published software.
Zenodo:
Amat Rodrigo, Joaquin, & Escobar Ortiz, Javier. (2024). skforecast (v0.22.0). Zenodo. https://doi.org/10.5281/zenodo.8382788
APA:
Amat Rodrigo, J., & Escobar Ortiz, J. (2024). skforecast (Version 0.22.0) [Computer software]. https://doi.org/10.5281/zenodo.8382788
BibTeX:
@software{skforecast, author = {Amat Rodrigo, Joaquin and Escobar Ortiz, Javier}, title = {skforecast}, version = {0.22.0}, month = {04}, year = {2026}, license = {BSD-3-Clause}, url = {https://skforecast.org/}, doi = {10.5281/zenodo.8382788} }
Did you like the article? Your support is important
Your contribution will help me to continue generating free educational content. Many thanks! 😊


This work by Joaquín Amat Rodrigo and Javier Escobar Ortiz is licensed under a Attribution-NonCommercial-ShareAlike 4.0 International.
Allowed:
-
Share: copy and redistribute the material in any medium or format.
-
Adapt: remix, transform, and build upon the material.
Under the following terms:
-
Attribution: You must give appropriate credit, provide a link to the license, and indicate if changes were made. You may do so in any reasonable manner, but not in any way that suggests the licensor endorses you or your use.
-
NonCommercial: You may not use the material for commercial purposes.
-
ShareAlike: If you remix, transform, or build upon the material, you must distribute your contributions under the same license as the original.